
I'm just doing regular MIG. It's the only thing I know - and I had to learn it for this project. I'm kind of just sinking all the seams into themselves and marching along. It feels like a lot of welding but it looks like it will be pretty solid. I"ll post up some pics soon.PRY4SNO wrote:Interested to see your approach to welding the subframes. What welding process are you using? I used STT (sorta like MIG) and did a lot of stitch welds, eventually getting a full seal.
My front is finished, and will start on the rear when I get a chance/days off.
Dave A. Rally CQ: Now in Seattle, sort of
Re: Dave A. Rally CQ Project: The Teardown
'95 Audi 90Q
'91 Audi CQ Project: Davescq.wordpress.com
'00 Buell X1 Racing Stripe
'91 Audi CQ Project: Davescq.wordpress.com
'00 Buell X1 Racing Stripe
Re: Dave A. Rally CQ Project: The Teardown
Ok, quick update. last night I scrubbed and rinsed suspension parts in prep for POR15.

Then I hung them all up to dry and prep for painting. Bearings are getting pressed in by Lee next week so they need to be done by then! Don't laugh too hard...

Diff lock actuator has been removed in prep for the electrical actuator. I'll be using:
http://store.firgelli.com/L12_S_Micro_L ... /l12-s.htm
I plan on strapping a flexible bellow over it to keep the crud out along with fabing up a little shield as part of the mount.
Diff fluid has been changed
Welding happening tonight. Damn the summer is tough to find time in...
Then I hung them all up to dry and prep for painting. Bearings are getting pressed in by Lee next week so they need to be done by then! Don't laugh too hard...
Diff lock actuator has been removed in prep for the electrical actuator. I'll be using:
http://store.firgelli.com/L12_S_Micro_L ... /l12-s.htm
I plan on strapping a flexible bellow over it to keep the crud out along with fabing up a little shield as part of the mount.
Diff fluid has been changed
Welding happening tonight. Damn the summer is tough to find time in...
'95 Audi 90Q
'91 Audi CQ Project: Davescq.wordpress.com
'00 Buell X1 Racing Stripe
'91 Audi CQ Project: Davescq.wordpress.com
'00 Buell X1 Racing Stripe
-
mr_aj_johnson
- Posts: 220
- Joined: Mon Apr 22, 2013 11:01 am
Re: Dave A. Rally CQ Project: The Teardown
Vittorio used a door lock actuator out of a mercedes something. Mine are purely mechanical.
Re: Dave A. Rally CQ Project: The Teardown
Hmmm... I do like the idea of purely mechanical. A carefully run push-pull wire should do the trick. I think I'll re-evaluate some options before pulling the trigger on the actuator.
'95 Audi 90Q
'91 Audi CQ Project: Davescq.wordpress.com
'00 Buell X1 Racing Stripe
'91 Audi CQ Project: Davescq.wordpress.com
'00 Buell X1 Racing Stripe
Re: Dave A. Rally CQ Project: The Teardown
https://mercedessource.com/node/1286 - I'm going to pick one up and try it (needs a little modification)
Re: Dave A. Rally CQ Project: The Teardown
Interesting. why not leave the vacuum actuator in place then?
As much vacuum piping, reservoirs, controllers, and wiring I can pull out the better. Which is why I'm leaning towards a push/pull cable now:
this with a clevis end should do the trick:
http://www.mcmaster.com/#push/pull-cont ... le/=y8jh0v
As much vacuum piping, reservoirs, controllers, and wiring I can pull out the better. Which is why I'm leaning towards a push/pull cable now:
this with a clevis end should do the trick:
http://www.mcmaster.com/#push/pull-cont ... le/=y8jh0v
'95 Audi 90Q
'91 Audi CQ Project: Davescq.wordpress.com
'00 Buell X1 Racing Stripe
'91 Audi CQ Project: Davescq.wordpress.com
'00 Buell X1 Racing Stripe
Re: Dave A. Rally CQ Project: The Teardown
Good thought on a cable setup like that. I may look into the same type of thing now as well.
Re: Dave A. Rally CQ Project: The Teardown
I'd be curious why Audi went from the cables to the pneumatic system on the UrQs
Re: Dave A. Rally CQ Project: The Teardown
In an OEM environment, they likely wanted to sell the "push of a button" phrase in marketing.
for me however, I think I'll get quite a lot of satisfaction from yanking and twisting a lever. "Fun mode, engaged"
for me however, I think I'll get quite a lot of satisfaction from yanking and twisting a lever. "Fun mode, engaged"
'95 Audi 90Q
'91 Audi CQ Project: Davescq.wordpress.com
'00 Buell X1 Racing Stripe
'91 Audi CQ Project: Davescq.wordpress.com
'00 Buell X1 Racing Stripe
Re: Dave A. Rally CQ Project: The Teardown
So I'll be pulling the engine soon and one topic I need to nail down better is oil cooling.
It looks like I can use a Oil cooler adapter of MC/3B/NF motors from 100/200s:
OEM PNs:
034 115 417
054 115 417
Looks like this:
http://audi.7zap.com/en/usa/audi+100+qu ... 5-9005/#1A
Then I'll find an aftermarket rad, run some lines and add ducting. Sound OK? Anyone have one laying around?
It looks like I can use a Oil cooler adapter of MC/3B/NF motors from 100/200s:
OEM PNs:
034 115 417
054 115 417
Looks like this:
http://audi.7zap.com/en/usa/audi+100+qu ... 5-9005/#1A
Then I'll find an aftermarket rad, run some lines and add ducting. Sound OK? Anyone have one laying around?
'95 Audi 90Q
'91 Audi CQ Project: Davescq.wordpress.com
'00 Buell X1 Racing Stripe
'91 Audi CQ Project: Davescq.wordpress.com
'00 Buell X1 Racing Stripe
Re: Dave A. Rally CQ Project: The Teardown
Ok so I picked up a turbo oil filter housing on MG, we'll see how that goes - seems pretty plug and play.
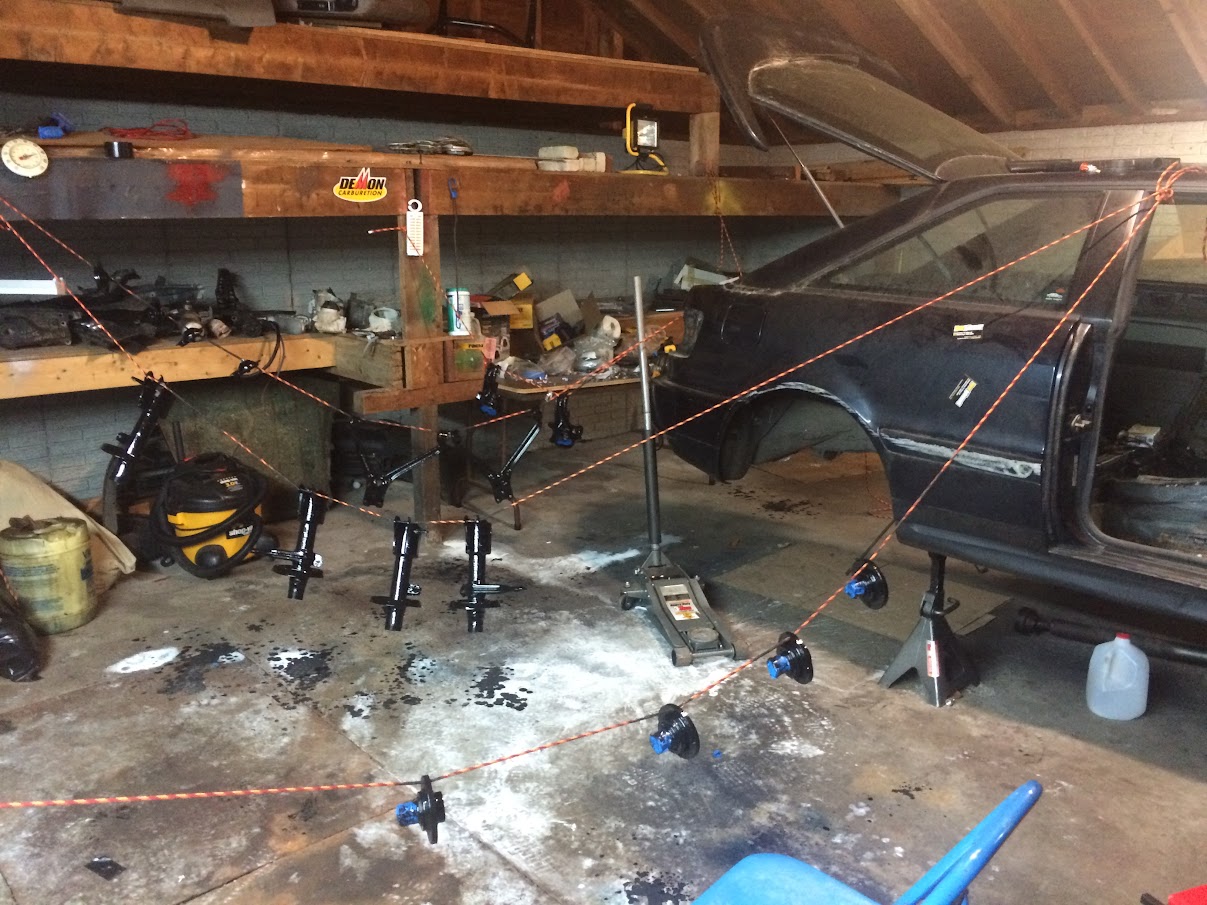
Been in the garage a good bit this week trying to finish lots of the suspension parts so I can finally do something else. First time using POR15 and all the accessory products. What they don't tell you, is that the metal prep is basically Acid and if you don't wash it ALL off, it will get into places and rain on your parade...
Paint round 1
Paint round 2

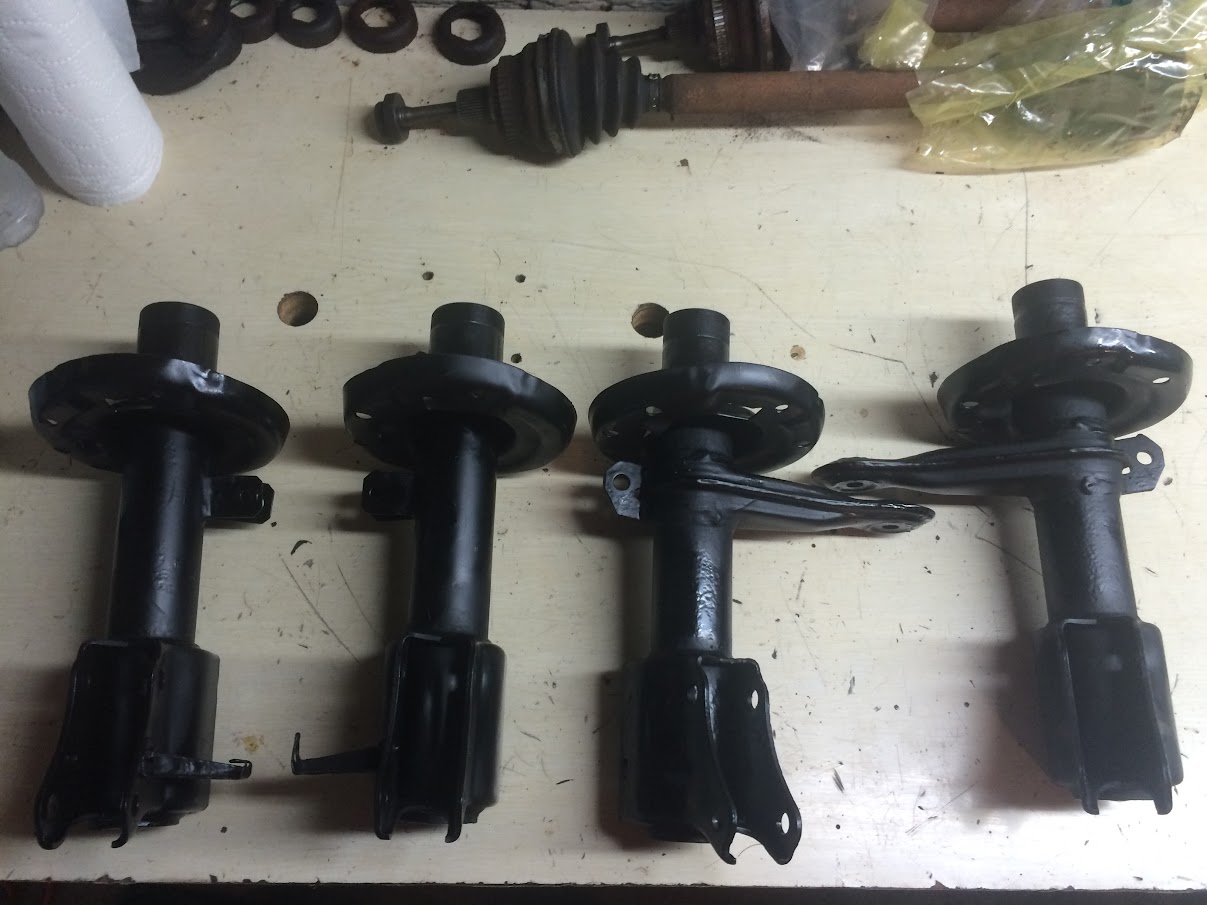
Strut Housings, not bad
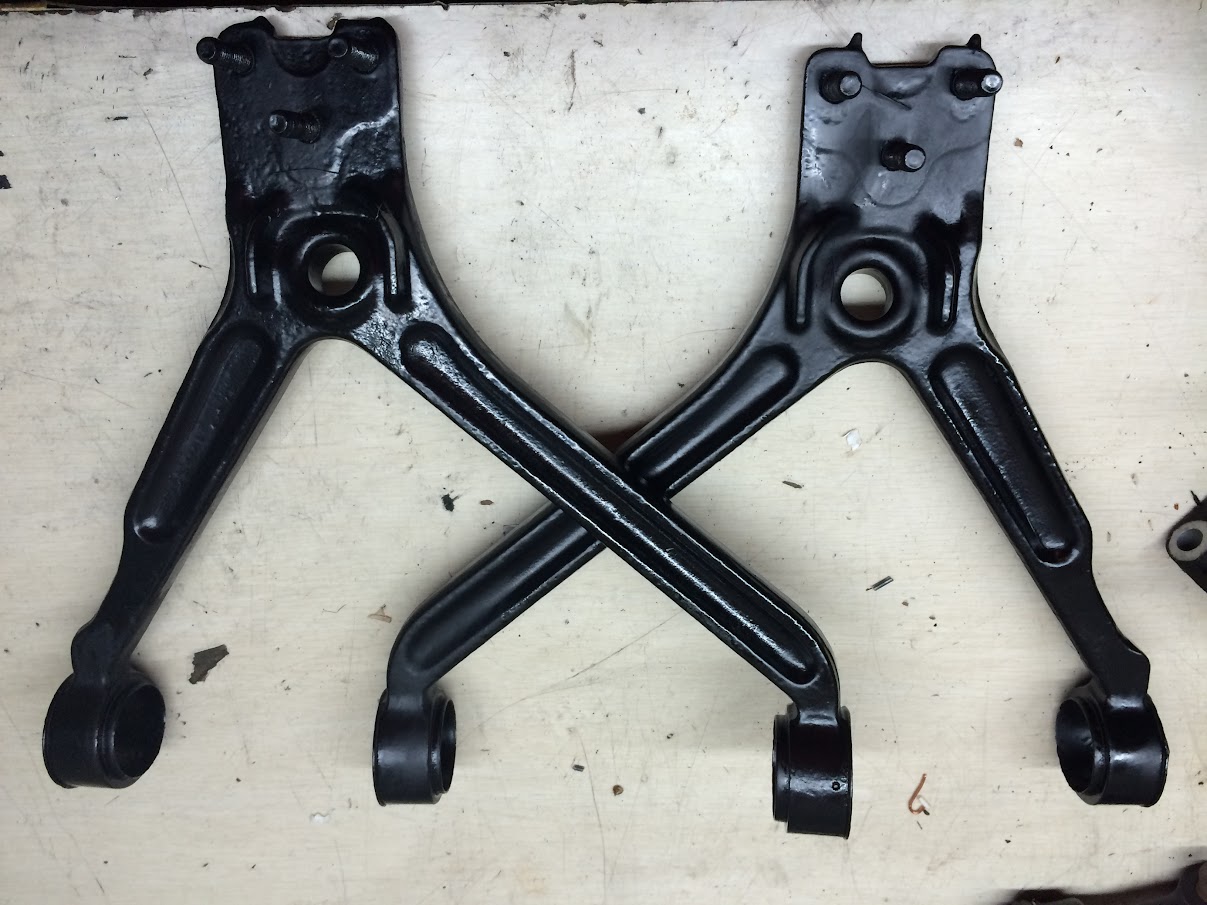
Front Arms looking good
Front Spindles looking good - pre peel

Then I discovered this:

and this... and so on:

SO that was essentially how all my bearing surfaces looked now. not cool. I spent some time with the wire brushes and got mose pieces to this point:

Here's the mistake I made. I taped off the machined surfaces in prep for the paint. then I applied the metal prep for 15-20 minutes as instructed. Then i rinsed the parts off. The problem is, the metal prep got under the tape and didn't wash out. Then I left the tape on there and painted and left it for a couple days to do 2 coats and let dry. All that time, the metal prep was eating away at my bearing surfaces... not cool.
Growing pains for sure. I'm dropping the hubs and spindles off with Lee today and I'm hoping the surface issues won't be a problem... ah well, onward!
Been in the garage a good bit this week trying to finish lots of the suspension parts so I can finally do something else. First time using POR15 and all the accessory products. What they don't tell you, is that the metal prep is basically Acid and if you don't wash it ALL off, it will get into places and rain on your parade...
Paint round 1
Paint round 2
Strut Housings, not bad
Front Arms looking good
Front Spindles looking good - pre peel
Then I discovered this:
and this... and so on:
SO that was essentially how all my bearing surfaces looked now. not cool. I spent some time with the wire brushes and got mose pieces to this point:
Here's the mistake I made. I taped off the machined surfaces in prep for the paint. then I applied the metal prep for 15-20 minutes as instructed. Then i rinsed the parts off. The problem is, the metal prep got under the tape and didn't wash out. Then I left the tape on there and painted and left it for a couple days to do 2 coats and let dry. All that time, the metal prep was eating away at my bearing surfaces... not cool.
Growing pains for sure. I'm dropping the hubs and spindles off with Lee today and I'm hoping the surface issues won't be a problem... ah well, onward!
'95 Audi 90Q
'91 Audi CQ Project: Davescq.wordpress.com
'00 Buell X1 Racing Stripe
'91 Audi CQ Project: Davescq.wordpress.com
'00 Buell X1 Racing Stripe
Re: Dave A. Rally CQ Project: The Teardown
Haha, didn't realize it was you. Keep up the good work. I like how this has been going.
"If you can't find one, make one"
Dallastown, PA
1991 Audi 80 quattro (20vt project)
1991 Audi Coupe Quattro (project: my first 20v)
2007 Mitsubishi Raider(Dakota in disguise)
2019 Chevy Cruze RS hatch (wife's little red sporty car)
Dallastown, PA
1991 Audi 80 quattro (20vt project)
1991 Audi Coupe Quattro (project: my first 20v)
2007 Mitsubishi Raider(Dakota in disguise)
2019 Chevy Cruze RS hatch (wife's little red sporty car)
-
the german
- Posts: 720
- Joined: Sat Feb 15, 2014 11:03 pm
- Location: Bellevue, WA
Re: Dave A. Rally CQ Project: The Teardown
That just looks like flash oxidation- nothing to worry about. Hit it with some scotch brite then wipe it down with WD40 and you are good to go.
Kirk
1990 ABZ CQ
1990 lifted CQ
2005 S4 6MT
2011 A4 2.0T Avant (ok, it's my wife's car but it's sexy and I love it)
1990 ABZ CQ
1990 lifted CQ
2005 S4 6MT
2011 A4 2.0T Avant (ok, it's my wife's car but it's sexy and I love it)
Re: Dave A. Rally CQ Project: The Teardown
Yeah I scratched it back to luster and coated it with some grease before dropping off at Lee's. Should have complete knuckles sometime next week!
I need to get my buddies engine hoist over to my garage, then the motor can come out and lots more work can begin.
I need to get my buddies engine hoist over to my garage, then the motor can come out and lots more work can begin.
'95 Audi 90Q
'91 Audi CQ Project: Davescq.wordpress.com
'00 Buell X1 Racing Stripe
'91 Audi CQ Project: Davescq.wordpress.com
'00 Buell X1 Racing Stripe
Re: Dave A. Rally CQ Project: The Teardown
Got a little work done this week so far. Disassembled a buddys engine hoist so that I could transport it. it's now in pieces in my garage... need to buy a load leveler and some chain
Last night I started prepping the engine to be removed. I've never done this engine/chassis before so I'm taking my time and learning as I go. Pulled out Cruise control and some of carbon canister stuff.
Just a couple pics of the engine bay before I did any work. I have california emissions on this car which is why you'll see a lot more THINGS around the airbox.


Should get some more time in this weekend. If anyone is parting a B4 I'd take the Brake booster and MC off their hands!
Last night I started prepping the engine to be removed. I've never done this engine/chassis before so I'm taking my time and learning as I go. Pulled out Cruise control and some of carbon canister stuff.
Just a couple pics of the engine bay before I did any work. I have california emissions on this car which is why you'll see a lot more THINGS around the airbox.
Should get some more time in this weekend. If anyone is parting a B4 I'd take the Brake booster and MC off their hands!
'95 Audi 90Q
'91 Audi CQ Project: Davescq.wordpress.com
'00 Buell X1 Racing Stripe
'91 Audi CQ Project: Davescq.wordpress.com
'00 Buell X1 Racing Stripe
Re: Dave A. Rally CQ Project: The Teardown
Get one from a B3. Iirc the boosters are smaller.
"If you can't find one, make one"
Dallastown, PA
1991 Audi 80 quattro (20vt project)
1991 Audi Coupe Quattro (project: my first 20v)
2007 Mitsubishi Raider(Dakota in disguise)
2019 Chevy Cruze RS hatch (wife's little red sporty car)
Dallastown, PA
1991 Audi 80 quattro (20vt project)
1991 Audi Coupe Quattro (project: my first 20v)
2007 Mitsubishi Raider(Dakota in disguise)
2019 Chevy Cruze RS hatch (wife's little red sporty car)
Re: Dave A. Rally CQ Project: The Teardown
Oh, B3s were sold with Vacuum brake boosters?
I guess I was assuming they were all this hydroboost crap...
I guess I was assuming they were all this hydroboost crap...
'95 Audi 90Q
'91 Audi CQ Project: Davescq.wordpress.com
'00 Buell X1 Racing Stripe
'91 Audi CQ Project: Davescq.wordpress.com
'00 Buell X1 Racing Stripe
Re: Dave A. Rally CQ Project: The Teardown
Nope, find any 80 or 90 with a 20v and you are set.
"If you can't find one, make one"
Dallastown, PA
1991 Audi 80 quattro (20vt project)
1991 Audi Coupe Quattro (project: my first 20v)
2007 Mitsubishi Raider(Dakota in disguise)
2019 Chevy Cruze RS hatch (wife's little red sporty car)
Dallastown, PA
1991 Audi 80 quattro (20vt project)
1991 Audi Coupe Quattro (project: my first 20v)
2007 Mitsubishi Raider(Dakota in disguise)
2019 Chevy Cruze RS hatch (wife's little red sporty car)
Re: Dave A. Rally CQ Project: The Teardown
good to know, thanks!DE80q wrote:Nope, find any 80 or 90 with a 20v and you are set.
'95 Audi 90Q
'91 Audi CQ Project: Davescq.wordpress.com
'00 Buell X1 Racing Stripe
'91 Audi CQ Project: Davescq.wordpress.com
'00 Buell X1 Racing Stripe

Re: Dave A. Rally CQ Project: The Teardown
Once you remove the charcoal canister, what do you do with the lines?
Find me on Instagram @pry4sno
|| 2010 Golf Sportwagen TDI /// #farmenwagen
|| 2002 Dodge Ram 2500 24vt 4x4 #bertancummins
|| 1992 80 quattro 20v /// Eventual AAN'd Winter Sled
|| 1990 Coupe quattro /// Because Racecar
|| 2010 Golf Sportwagen TDI /// #farmenwagen
|| 2002 Dodge Ram 2500 24vt 4x4 #bertancummins
|| 1992 80 quattro 20v /// Eventual AAN'd Winter Sled
|| 1990 Coupe quattro /// Because Racecar
Re: Dave A. Rally CQ Project: The Teardown
If you are like me, you leave it open. The problem there is it almost always smells likd fuel under the hood. I'm going to put a check valve on mine. This way it doesn't cause a vucuum condition in the tank.
"If you can't find one, make one"
Dallastown, PA
1991 Audi 80 quattro (20vt project)
1991 Audi Coupe Quattro (project: my first 20v)
2007 Mitsubishi Raider(Dakota in disguise)
2019 Chevy Cruze RS hatch (wife's little red sporty car)
Dallastown, PA
1991 Audi 80 quattro (20vt project)
1991 Audi Coupe Quattro (project: my first 20v)
2007 Mitsubishi Raider(Dakota in disguise)
2019 Chevy Cruze RS hatch (wife's little red sporty car)
Re: Dave A. Rally CQ Project: The Teardown
Yeah I'm trying to avoid the fuel smell but want to ditch the canister and clean up the engine bay.
Find me on Instagram @pry4sno
|| 2010 Golf Sportwagen TDI /// #farmenwagen
|| 2002 Dodge Ram 2500 24vt 4x4 #bertancummins
|| 1992 80 quattro 20v /// Eventual AAN'd Winter Sled
|| 1990 Coupe quattro /// Because Racecar
|| 2010 Golf Sportwagen TDI /// #farmenwagen
|| 2002 Dodge Ram 2500 24vt 4x4 #bertancummins
|| 1992 80 quattro 20v /// Eventual AAN'd Winter Sled
|| 1990 Coupe quattro /// Because Racecar
Re: Dave A. Rally CQ Project: The Teardown
Yes, I plan on running a one-way fuel vapor check valve up to where the sunroof drained into the hatch cavity.
no fuel vapors in the engine bay for me.
no fuel vapors in the engine bay for me.
'95 Audi 90Q
'91 Audi CQ Project: Davescq.wordpress.com
'00 Buell X1 Racing Stripe
'91 Audi CQ Project: Davescq.wordpress.com
'00 Buell X1 Racing Stripe
Re: Dave A. Rally CQ Project: The Teardown
something like this:
http://www.mcmaster.com/#47245k37/=yd4nm1
abrasion, UV and fuel resistant - should be good, not a bad price.
http://www.mcmaster.com/#47245k37/=yd4nm1
abrasion, UV and fuel resistant - should be good, not a bad price.
'95 Audi 90Q
'91 Audi CQ Project: Davescq.wordpress.com
'00 Buell X1 Racing Stripe
'91 Audi CQ Project: Davescq.wordpress.com
'00 Buell X1 Racing Stripe
Re: Dave A. Rally CQ Project: The Teardown
Still Digging:
I took Friday off to actually get something done, I've never been at the garage this early before - it felt nice!

One more snapshot before it all comes apart:

I was working alone and pulling the motor for the first time so progress was slow but the engine was out around 2pm. I had to run to HD twice for stuff to grab on the motor. But that harbor freight load lever worked mint! Almost destroyed the tranny ground as I missed it for a while... Driveshaft still attached:

After some penetrating fluid and a work with a rubber mallet, that was removed as well and I removed the last stud from the Trans out coupling that I buzzed off on a previous day:

Spent some time vacuuming up mouse turns and removing the charcoal canister and associated stuff. Next up is removal of ABS, Brake booster and associated hydraulic lines, fuel lines, brake lines, battery tray, auxillary winshield washer tank/pump/wiring... and much much more.
Need to order the clutch soon as that will the "bottom" of the teardown. I'm thinking southbend stage 2E - easily enough torque potential for the forseeable future. Need to replace the slave cylinder and that hydraulic line as well - I suppose I'll go custom AN setup there - maybe the 034 part: http://store.034motorsport.com/clutch-s ... assis.html (anyone used this before)?
I took Friday off to actually get something done, I've never been at the garage this early before - it felt nice!
One more snapshot before it all comes apart:
I was working alone and pulling the motor for the first time so progress was slow but the engine was out around 2pm. I had to run to HD twice for stuff to grab on the motor. But that harbor freight load lever worked mint! Almost destroyed the tranny ground as I missed it for a while... Driveshaft still attached:
After some penetrating fluid and a work with a rubber mallet, that was removed as well and I removed the last stud from the Trans out coupling that I buzzed off on a previous day:
Spent some time vacuuming up mouse turns and removing the charcoal canister and associated stuff. Next up is removal of ABS, Brake booster and associated hydraulic lines, fuel lines, brake lines, battery tray, auxillary winshield washer tank/pump/wiring... and much much more.
Need to order the clutch soon as that will the "bottom" of the teardown. I'm thinking southbend stage 2E - easily enough torque potential for the forseeable future. Need to replace the slave cylinder and that hydraulic line as well - I suppose I'll go custom AN setup there - maybe the 034 part: http://store.034motorsport.com/clutch-s ... assis.html (anyone used this before)?
'95 Audi 90Q
'91 Audi CQ Project: Davescq.wordpress.com
'00 Buell X1 Racing Stripe
'91 Audi CQ Project: Davescq.wordpress.com
'00 Buell X1 Racing Stripe