Page 4 of 19
Re: Kirk's Lifted Audi CQ Project: Tires!
Posted: Fri Mar 25, 2016 2:50 pm
by dalspaugh
the german wrote:dalspaugh wrote:
Perhaps I'll get a chance to see it! I'm looking at moving out to the seattle region this summer if I can find the right internal transfer with Amazon.
...which reminds me... I need to finish the rally car...
Cool! Let me know if you do- I have a number of friends at Amazon and there is a pretty active bunch of old school AUDI folks out here. I think there is a pretty dedicated rally crowd too!
right on, will do!
Re: Kirk's Lifted Audi CQ Project: Tires!
Posted: Fri Mar 25, 2016 3:39 pm
by Dan McBoost
this build is full of winning, no matter how well it does, heh
Re: Kirk's Lifted Audi CQ Project: Tires!
Posted: Fri Mar 25, 2016 10:23 pm
by the german
Dan McBoost wrote:this build is full of winning, no matter how well it does, heh
Haha thanks Dan

Re: Kirk's Lifted Audi CQ Project: Tires!
Posted: Fri Mar 25, 2016 10:48 pm
by the german
OK, a bit more progress. Stopped by the local German wrecking yard that is run by a buddy of mine (and fellow fan of old Audi's) to get some missing bits:
-Headlight wiring (got a pair of old B4 lights from Alex, but they were missing the internal wiring)
-Headlight pigtails (B3 to B4 conversion)
-A nearly complete set of Allroad fender flares (Cory's idea, not yet sure if I'll use them)
-Battery
-Horns
-Battery hold-down
For the headlights, there weren't any B4 cars in the yard with broken lights so I ended up with a set of beat up Passat headlights to cannibalize. Interestingly they have the same connector as the B4 lights which is perfect for what I wanted; only difference is an extra pin for the DRL's which I removed.

Passat headlight w/ pigtail

Internal wiring from the Passat lights

Remove the DRL circuit & de-pin the connector

Perfect fit in it's new home


And onto the car! Got some clear corners ordered up from eBay to go with them. Unfortunately it looks like I have some electrical issues to sort out with the lights. The high beams will come on when you pull the column switch toward you (like to flash your lights) but neither the low or high beams will come on full time when you switch them on. Might need to find a good replacement square column stalk.

Next up, horns from an Allroad w/ pigtails. Got them wired in and they work great!

And finally, got the rear subframe all welded up.


Just test fit it back in the car and have the first coat of paint drying on it as I type this. Should be able to final install it in the car in the morning, then maybe do some more suspension and brake work before moving on to the front.
Re: Kirk's Lifted Audi CQ Project: Rear subframe done
Posted: Tue Mar 29, 2016 2:34 am
by the german
On Easter I had a rather unpleasant surprise with my wife's A4 Avant when I discovered what is apparently a know (but less common) issue on the 2.0T TSI motors: spontaneous timing chain tensioner failure. I was luck enough to bend valves in all 4 cylinders and have zero compression across the board! Luckily my wife is traveling this week so she doesn't need her car, but that doesn't help much for next week when she gets back. In other words: there is a new sense of urgency to getting this thing driving under it's own power so that I can get it out of the garage and make room to do a motor swap on the Avant. And here that car was supposed to be the "reliable" one in the fleet. Shit.
Oh yeah.. anyone have a low mile CAEB in the Seattle area? I'm now in the market.
OK enough bitching and on the last few days progress:
Got the front suspension subframe finished up tonight and painted tonight


Also got the new extended brake lines installed on the car. First car I have had where the caliper can rest on the floor with the car on jack stands.


Back when I first got the car I tried to get it running well enough to go take it for a test drive and see if there was anything wrong I didn't know about. In trying to flush the brake system, I found it absolutely impossible to bleed the brakes. I could pull full vacuum on the caliper bleed port and no fluid would flow through any of the lines and the brake pedal would go to the floor and stay there. I figured I had a bad master cylinder so I abandoned the idea of driving it first and started tearing it apart.
Fast forward to today, and once again I'm playing with brakes. With the soft lines off at each corner, I was sucking the hard lines dry to get all the nasty old crap out of them (and there was a lot) but I still couldn't pull any fluid through the rear lines. Even with the line on the master unscrewed I couldn't get anything, so this left the ABS as the culprit. I swapped the master and brake bias valve with known-good ones off my red CQ and deleted the ABS.

Now I just need another person to help me bleed and they should be set. It's getting closer to driving!
Re: Kirk's Lifted Audi CQ Project: Rear subframe done
Posted: Tue Mar 29, 2016 10:54 am
by Dan McBoost
Re: Kirk's Lifted Audi CQ Project: Rear subframe done
Posted: Tue Mar 29, 2016 12:47 pm
by dalspaugh
ABS delete in this car... sooooo satisfying. looking good!
Oh and +1 for the motive bleeder, great piece.
Re: Kirk's Lifted Audi CQ Project: Rear subframe done
Posted: Tue Mar 29, 2016 2:05 pm
by the german
I'm going to borrow Alex's motive bleeder; I've been too cheap to buy my own lol
Re: Kirk's Lifted Audi CQ Project: Rear subframe done
Posted: Tue Mar 29, 2016 2:06 pm
by the german
dalspaugh wrote:ABS delete in this car... sooooo satisfying. looking good!
I think I just saved enough weight to offset my front skid plate too ;-)
Re: Kirk's Lifted Audi CQ Project: Rear subframe done
Posted: Tue Mar 29, 2016 7:03 pm
by heartlessnomad12
Even I have a bleeder!!
Re: Kirk's Lifted Audi CQ Project: Rear subframe done
Posted: Wed Mar 30, 2016 1:58 am
by the german
heartlessnomad12 wrote:Even I have a bleeder!!
Ha! I love that your first post on this forum is giving me shit. Glad you made it over

Re: Kirk's Lifted Audi CQ Project: Rear subframe done
Posted: Wed Mar 30, 2016 2:26 am
by the german
Getting closer and closer to having it driveable, and discovering things that need to be addressed in the process.
Started off this evening by getting the front subframe installed


Then got the front corner packages assembled. Took some creative jacking to get the axle shafts in their place and the knuckles bolted to the struts but in the end it seems to work just fine. The axles are at their absolute maximum articulation for the inner CV at full droop, and there is a hard interference between the bottom edge of the strut body and the axle shaft. Other than dropping the motor I'm not sure what I can do about that, and after installing the front subframe I realized I didn't leave any room between the rear tube and the trans to drop the motor if I need to. Oops.


Next up, got started on the exhaust. I was originally planning to retain the CAT, but with the rear tube on the spacer subframe it would have to be super low so I decided to forego it. Hopefully I don't have to get a state inspection when I transfer the car title from California to Washington. Worst case scenario I have to weld in much smaller B6 S4 cat I have on the shelf.
The space I have to work with

As far as I got today


Not installed here since it's a PITA to work around when taking this piece in and out to fit it up, but the heat shield for the CV still fits in there.


Last item for the day was cleaning up and painting a set of front control arms I picked up to try using on the rear. The front control arms are a-symmetrical, but the ball joints are offset such that the joint is still in the middle of the arm. Conversely, the rear control arms are symmetrical and the ball joints are offset such that the joint is behind center on the control arm. Since my rear tire is closer than I like to the front of the fender well, my plan is to try using a set of front control arms in the rear with the right and left ball joints swapped to move the wheel back and center it better in the wheel well. I *think* this will give me roughly neutral caster in the rear. We will see if that holds true when I get them installed tomorrow.

Re: Kirk's Lifted Audi CQ Project: Rear subframe done
Posted: Wed Mar 30, 2016 3:00 am
by alxdgr8
You shouldn't have to do anything to transfer titles since it's old. It'll transfer just like a WA car. No inspection
Sent from my Nexus 6P using Tapatalk
Re: Kirk's Lifted Audi CQ Project: FIRST DRIVE!
Posted: Thu Mar 31, 2016 1:50 am
by the german
Well, my new ball joints for the offset rear control arms didn't show up today so I didn't get to put those on. I did however finish up the exhaust, bleed the brakes, and TAKE IT FOR IT'S FIRST DRIVE!!
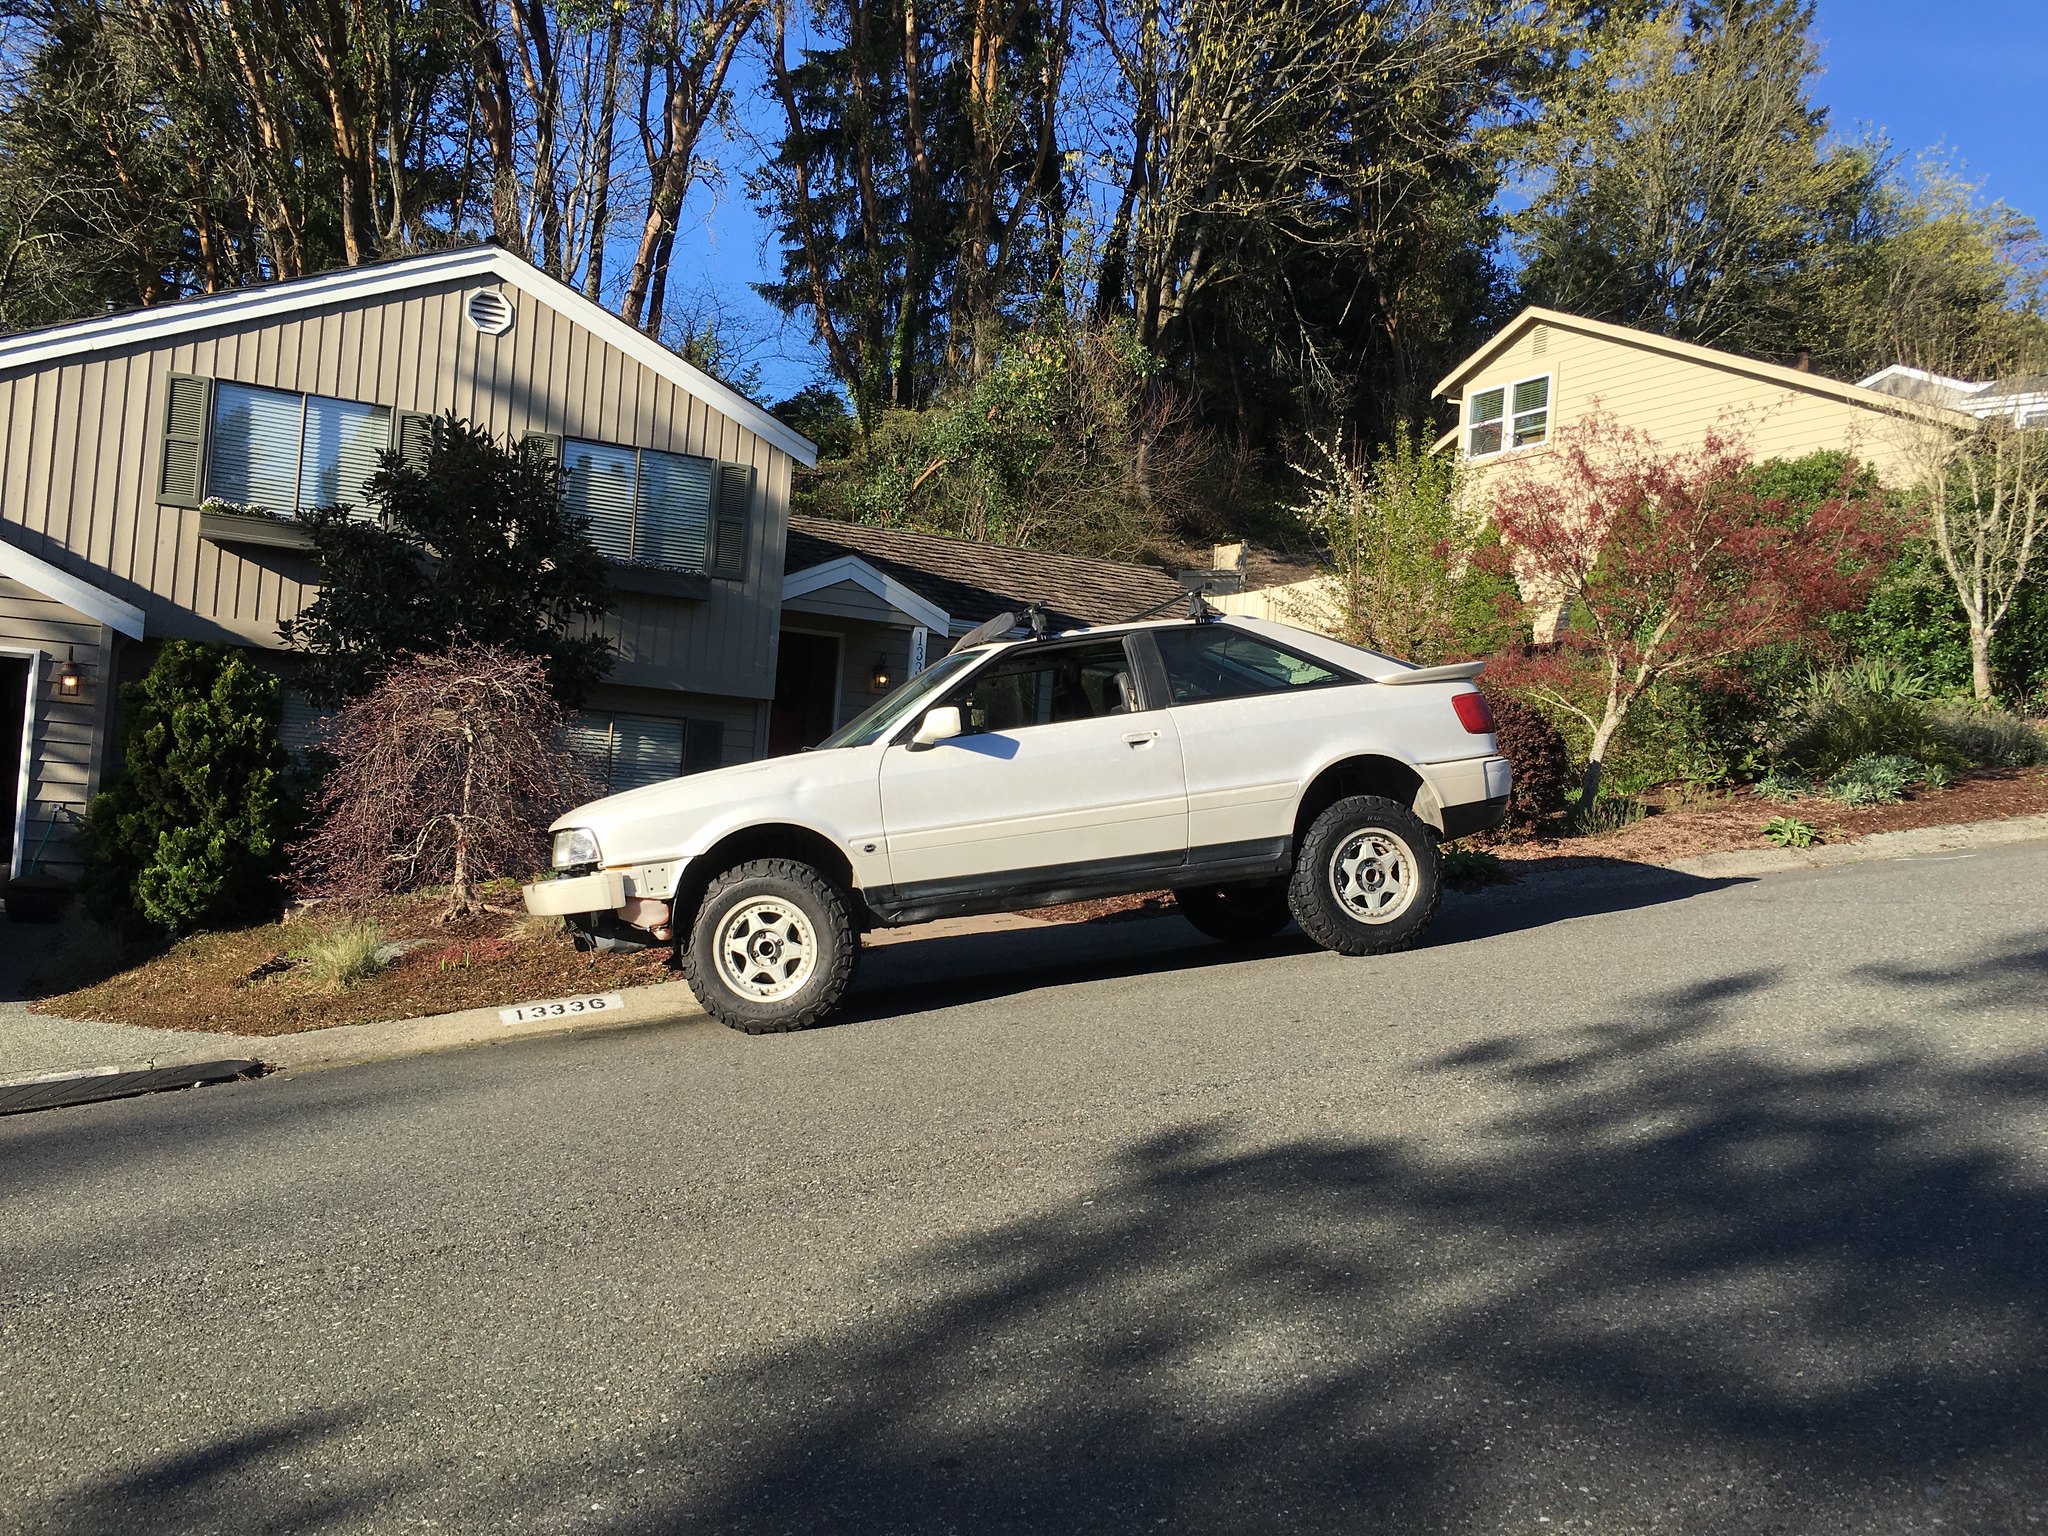
Without the offset rear control arms the rear tires are rubbing on the bottom edge of the fender liner so I only drove it around the block. First impression was good; everything seemed to work as it should so I'm feeling rather encouraged! It also means I can move it out of the garage and make space for swapping a motor on my wife's car, which was a primary objective for the week.
Exhaust done:

Back on it's wheels for a test drive:


The old checklist is getting a lot shorter! Once I get the suspension sorted I'll move on to fixing up the interior.

Re: Kirk's Lifted Audi CQ Project: FIRST DRIVE!!
Posted: Thu Mar 31, 2016 1:28 pm
by Dan McBoost
Re: Kirk's Lifted Audi CQ Project: FIRST DRIVE!!
Posted: Fri Apr 01, 2016 2:05 am
by the german
Re: Kirk's Lifted Audi CQ Project: FIRST DRIVE!!
Posted: Fri Apr 01, 2016 6:39 am
by alxdgr8
Dude that looks amazing sitting on the street. I can only imagine your neighbors. Can't wait to see you drive it around Bellevue and see what kind of looks you get.
Sent from my Nexus 6P using Tapatalk
Re: Kirk's Lifted Audi CQ Project: FIRST DRIVE!!
Posted: Fri Apr 01, 2016 6:45 am
by DE80q
You won't see another one like it anytime soon, that's for sure! Definitely looks beastly though.
Re: Kirk's Lifted Audi CQ Project: FIRST DRIVE!!
Posted: Fri Apr 01, 2016 6:50 am
by WOMBAT
SO. Much. Awesome.
Everybody needs one of these!
Re: Kirk's Lifted Audi CQ Project: FIRST DRIVE!!
Posted: Fri Apr 01, 2016 12:12 pm
by PRY4SNO
Vicarious living, at its finest!
Sent from my SM-G900W8 using Tapatalk
Re: Kirk's Lifted Audi CQ Project: FIRST DRIVE!!
Posted: Fri Apr 01, 2016 2:22 pm
by dalspaugh
nailed it. love it. keep making it better.
Re: Kirk's Lifted Audi CQ Project: FIRST DRIVE!!
Posted: Sat Apr 30, 2016 2:46 am
by the german
Time for an update!
Progress was stifled for a bit between traveling for work and working on fixing my wife's A4 (which decided it really didn't like having straight valves one day). Ended up getting a "new" engine w/ 13k miles on it for a few hundred dollars more than it would have cost for just a new head and the parts to swap it out. One evening after work to get the old one out, and another evening to get the new one in. With that done, the garage and my time are once again free to work on the lifted Coupe.
First off, I needed to deal with my axle length issue. I popped the passenger side front axle out of the outer CV while pulling out of my driveway, which made it quite clear I needed to either chop and lengthen the axle shafts or make some axle spacers. I like being able to bolt on replacement parts as much as possible, so I opted for spacers.
I'm going to start posting pics of the drawings for the custom parts I make. I've already had a few questions about dimensions I didn't keep/take pictures of the sketches of, so maybe this will be useful to somebody someday.
I ended up making mine 3/4" thick.

Started w/ 1" slices of 4.25" round 6061 aluminum bar stock

Machined

Drilled

Installed

While I was in there I fixed the axle that pulled out of the CV, and took the opportunity to pull the front strut assemblies back out for some modification: Trimming the bottoms for axle clearance, and installing shock boots + bump stops (the parts hadn't arrived by the time I wanted to put it all together last time so they have been sitting on the bench waiting).
Strut housing modification:

Hopefully this is enough.

Welded it back up

Then paint, boots + bump stops, and back in the car for hopefully the last time

Next up is fabricating the rear tie rods. With using the offset control arm + ball joints to center the rear wheels in the arches, I found I needed shorter rear tie rods to get the correct alignment. Unfortunately the rear control arms for these things are cast, which means chopping and welding them shorter is not a good option. Alternatively I could do the super fancy billet aluminum + spherical thing, but those are expensive AND I'm trying to keep rubber bushing in the suspension so it stays relatively comfortable to drive.
Instead, I came up with a cunning plan to modify a couple of front tie rod assemblies for use in the rear. At $21 each on Rock Auto it's by far the cheapest option too.
The measurement for the new ones worked out to removing 12" from the front tie rod to make it work in the rear.


When I went to test fit the pieces before welding them up, I discovered a snag in my plan: different tie rod end attachment sizes front and rear. I had assumed they were the same. Luckily they are the same taper angle, just a different diameter so they can be adapted with a machined steel bushing.

Welded, painted, and assembled:

Adapter bushings


Installed - they work great!

Re: Kirk's Lifted Audi CQ Project: FIRST DRIVE!!
Posted: Sat Apr 30, 2016 9:35 am
by versacehobo
Awesome project.

Re: Kirk's Lifted Audi CQ Project: FIRST DRIVE!!
Posted: Sat Apr 30, 2016 9:43 am
by ringbearer
Fantastic project and stellar machine work! What a little beast

Re: Kirk's Lifted Audi CQ Project: FIRST DRIVE!!
Posted: Sat Apr 30, 2016 9:45 am
by DE80q
I really like the use of the front tie rods for the rear, very ingenious!
We need some vids of this thing moving now!