I will list what I ordered to make it happen...
basically, you add a stud mount conversion to the top side of the strut so that you can get rid of the upper eyelet and it also makes it lower profile which means more travel/stroke for the shock.
You remove your rubber spring seat on the top, weld in a washer to hold the rubber bushings for the shock stud.
These shocks can be ordered with either a poly bushing/sleeve or you can order them with a spherical bearing. I choose to do bushing on the bottom. I might try the bearing later and see if there is any noise transfer. The good part is that you only have to order the bearing and it is cheap. You just pop out the bushing and add the bearing with two C-clips that come with the bearing. The shock end already has the groove for either setup.
(IMPORTANT) at least for me anyway. the shock mount eyelet is more narrow than the factory end, therefore leaving room to slide the shock on the bolt on the lower mount forward. Then add a sleeve on the lower shock bolt to keep the shock and mount more forward that way it gives you plenty of clearance for you coil spring to clear the CV Axle all of the way through the suspension travel. It works awesome. The top side is a stud with two rubber bushing (one on top and one on bottom) of your upper spring plate. I welded a washer in from the bottom side to hold the stud. I clearanced the upper mount with a bur bit or pencil tip grinder. With the car going to be set up this low, it was beneficial/necessary to bring the top mount forward as much as you can get it. (Also because I slid the bottom side of the shock forward as well. This way, you will not have any premature wearing of the rubber bushings. Everything is aligned correctly when the car is sitting at it's natural state.
Josh's 2.5 200QT.
Re: Josh's 2.5 200QT.
- Attachments
-
- Promastar dd602.JPG (65.92 KiB) Viewed 40435 times
-
- Promastar specs.JPG (50.09 KiB) Viewed 40435 times
-
- Promastar stud.JPG (67.54 KiB) Viewed 40435 times
-
- promastar.JPG (40.35 KiB) Viewed 40435 times
-
- PromastarHTsprings.JPG (107.54 KiB) Viewed 40435 times

Re: Josh's 2.5 200QT.
Extremely slick idea. Wonder what the damping is like on those shocks?
Only downside is the cost i'd guess. But you don't need to buy coil sleeves or perches so there's a couple bucks you save.
I dig it!
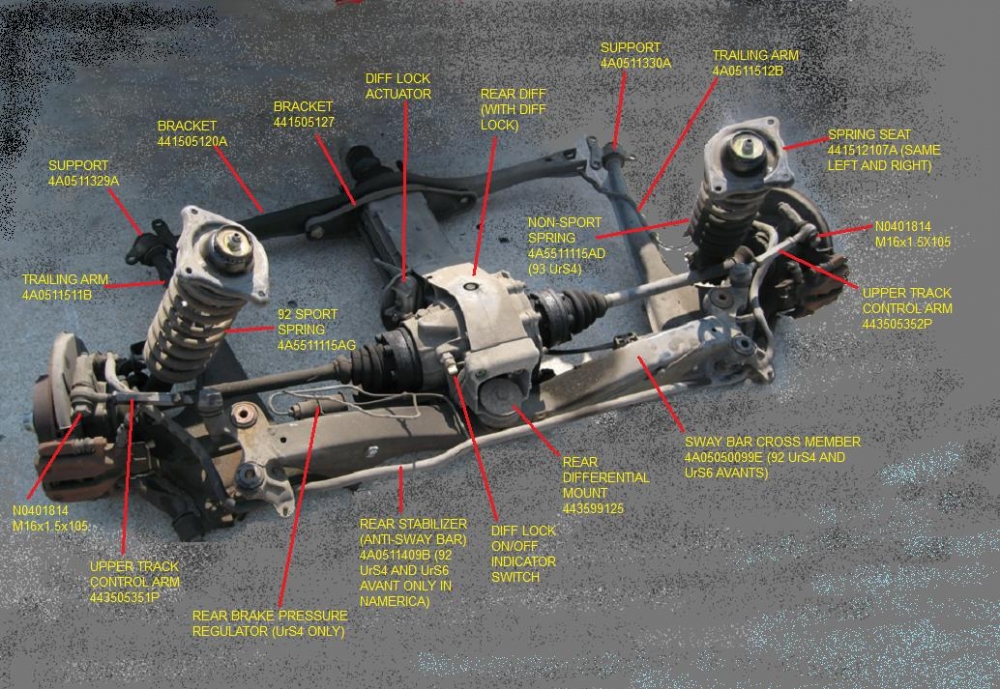
Going back to the rear crossmember and whatnot. So you said there's no bushings on the rear subframe? So it goes straight from subframe to chassis with no rubber? I thought only 5k's had that. Maybe early 200's too it seems.
Only downside is the cost i'd guess. But you don't need to buy coil sleeves or perches so there's a couple bucks you save.
I dig it!
Going back to the rear crossmember and whatnot. So you said there's no bushings on the rear subframe? So it goes straight from subframe to chassis with no rubber? I thought only 5k's had that. Maybe early 200's too it seems.
-Phil
87 5ktq - 20vt
91 v8 5spd - Why?
05 S4 - Gone and very much so forgotten
14 TDI Touareg
-Terrible at responding to PM's
87 5ktq - 20vt
91 v8 5spd - Why?
05 S4 - Gone and very much so forgotten
14 TDI Touareg
-Terrible at responding to PM's
Re: Josh's 2.5 200QT.
Yeah, mine just bolts straight to body. There are four studs sticking out of the bottom. I guess it's less bushings for me to worry about. Mine is a twenty valve sucka car (or was) and maybe that's why.
Re: Josh's 2.5 200QT.
Here is the coilover mounted to the top plate
- Attachments
-
- image.jpg (1.24 MiB) Viewed 40425 times
-
- image.jpg (1.36 MiB) Viewed 40425 times
-
- image.jpg (1.32 MiB) Viewed 40425 times

Re: Josh's 2.5 200QT.
I need to see if UrS top mounts are the same... it doesn't look the same tho... Could still work...
Sent from my SM-N910F using Tapatalk
Sent from my SM-N910F using Tapatalk
UglyUr 2.5L 95.5mm Stroker
Rubi PTE6062 Gen 2 Screamer
Rubi PTE6062 Gen 2 Screamer
Re: Josh's 2.5 200QT.
From what I've seen. 91 200 and urs rear mounts are the same. non 20v 200/5000 chassis have a different rear mount which is much shittier(a very technical term) that works but isnt as good or as robust. I'm not sure what Josh has for rear mounts on his. From my understanding they should be the shitty ones but they look like they're urs/20020v
-Phil
87 5ktq - 20vt
91 v8 5spd - Why?
05 S4 - Gone and very much so forgotten
14 TDI Touareg
-Terrible at responding to PM's
87 5ktq - 20vt
91 v8 5spd - Why?
05 S4 - Gone and very much so forgotten
14 TDI Touareg
-Terrible at responding to PM's
Re: Josh's 2.5 200QT.
20V 200's and S4 will work. The concept is exactly the same.
I will show you a pic of the lower mount, you will notice I pushed the shock forward to add clearance from the CV axle. I used a washer for good mating/squeezing surface for the poly bushing of the shock end and cut a sleeve to keep the shock tight to to front of the car, basically the shock is moved forward about 1/2".
I will show you a pic of the lower mount, you will notice I pushed the shock forward to add clearance from the CV axle. I used a washer for good mating/squeezing surface for the poly bushing of the shock end and cut a sleeve to keep the shock tight to to front of the car, basically the shock is moved forward about 1/2".
- Attachments
-
- image.jpg (1.25 MiB) Viewed 40356 times
-
- image.jpg (1.49 MiB) Viewed 40356 times

Re: Josh's 2.5 200QT.
Nice work on that suspension! Cool solution.
But for the love of all thats holy.....please grant us the joy of a video of this thing on boost. It must be a monster.
Some of us have been reduced to driving diesels!!!!!
But for the love of all thats holy.....please grant us the joy of a video of this thing on boost. It must be a monster.
Some of us have been reduced to driving diesels!!!!!
current:
-mk4 tdi wagon with some mods
-TDI b3 90q, holset turbo, be strong little connecting rods!
-the turbo tractor
past:
-11 second 90q junker
-20vt swapped 90q winter beater
-efi 20vt 4kq
-way too many other long gone urs's, 200's 4000's, b5's
-mk4 tdi wagon with some mods
-TDI b3 90q, holset turbo, be strong little connecting rods!
-the turbo tractor
past:
-11 second 90q junker
-20vt swapped 90q winter beater
-efi 20vt 4kq
-way too many other long gone urs's, 200's 4000's, b5's

Re: Josh's 2.5 200QT.
That's pretty cool Josh. The red looks great, too.
Matt
18 Silverado 1500 work pig, roof rack and tonneau cover
11 Jetta sedan TDI DSG, rear muffler delete
GONE :( 87 4ktq - 4 FOX SNAKES

18 Silverado 1500 work pig, roof rack and tonneau cover
11 Jetta sedan TDI DSG, rear muffler delete
GONE :( 87 4ktq - 4 FOX SNAKES

Re: Josh's 2.5 200QT.
Nice, this is a great solution for rear suspension. However, I'm curious about the damping rates too because these guys typically make stuff for lightweight circle track cars, not rocket couches...
Sure, they may be using spring rates similar to us, but they sure don't have the same mass. The spring/mass/damper system is entirely dependent on all three variables!
Sure, they may be using spring rates similar to us, but they sure don't have the same mass. The spring/mass/damper system is entirely dependent on all three variables!
-Chris
'91 Audi 200 20v - Revver/BAT project
'91 Audi 200 20v Avant
'01 Anthracite M5
'90 M3
'85 Euro 635csi
'12 X3
E34 530i (maybe rear-mount soon)
'91 Audi 200 20v - Revver/BAT project
'91 Audi 200 20v Avant
'01 Anthracite M5
'90 M3
'85 Euro 635csi
'12 X3
E34 530i (maybe rear-mount soon)
Re: Josh's 2.5 200QT.
I talked to them about the dampening and they said the Proma Star series was designed around street/muscle cars ranging from 3200-4200 pound cars. Ill give more details once the rest of my parts trickle in from the mail. And I put it back together. I already had the coilovers in there and it seemed really nice. I didn't beat it up too much or try to do different adjustments before jerking the whole ass end out to rebuild everything. I'm pretty confident in the way it felt. It is much better at handling the power when boost comes in. It didn't just dump the ass end this time and that was just with two clicks in on the compression stroke adjuster. The 12" springs seem pretty easy too. I backed both adjustments off on the shocks and bounced on the car and these high travel springs definitely feel like there is more travel compared to my H&R's when I bounced on the rear bumper. Time will tell when I start daily driving it in about 2-3 weeks.
Re: Josh's 2.5 200QT.
I'm just posting a little more detail about the rear suspension rebuild. The energy suspension bushings for the front of the rear lower control arm fit perfectly but the sleeves had to be shortened a little to insure the bushings would not walk or work themselves out of their housings. I made sure when tightened down, the two washers were just barely holding the two halves pressed in. You can see in the "before picture" how much space the was for the bushings to walk around on the sleeves. Now the surface of the washers back the flanges on the bushings to hold a snug fit. If you cut the sleeves too short, the bushings will get squeezed too tight and cause the two bushings to bulge inside of the housing and probably be too tight and prematurely wear. I also added grease zerks and drilled relief ports so the lubricant can get to and keep the sleeve/bushing surface lubed. The idea was to have the grease inserted, go in the hole and get straight to the sleeve, then when that filled, the pressure would build forcing the grease to follow the beveled grove split of the two bushing halves around the other side until the grease reached the other drilled port.
- Attachments
-
- image.jpg (1.22 MiB) Viewed 40272 times
-
- image.jpg (2.23 MiB) Viewed 40272 times
-
- image.jpg (3.05 MiB) Viewed 40272 times
-
- image.jpg (1.27 MiB) Viewed 40272 times

Re: Josh's 2.5 200QT.
Smooth move!
Find me on Instagram @pry4sno
|| 2010 Golf Sportwagen TDI /// #farmenwagen
|| 2002 Dodge Ram 2500 24vt 4x4 #bertancummins
|| 1992 80 quattro 20v /// Eventual AAN'd Winter Sled
|| 1990 Coupe quattro /// Because Racecar
|| 2010 Golf Sportwagen TDI /// #farmenwagen
|| 2002 Dodge Ram 2500 24vt 4x4 #bertancummins
|| 1992 80 quattro 20v /// Eventual AAN'd Winter Sled
|| 1990 Coupe quattro /// Because Racecar
Re: Josh's 2.5 200QT.
Here's a shot of the clearance of the coilover (with collar adjusted all of the way down to bottom of shock) and CV. It's nice to run a 12-14" coil spring and still have a lowered stance.
- Attachments
-
- image.jpg (2.46 MiB) Viewed 40240 times
Re: Josh's 2.5 200QT.
Cool idea on the grease. Is that grease appropriate for the poly material? I know powerflex supplies special grease with theirs. It may not be that special though.
Why do you say it's nice to have such a long spring and still be lowered? I don't see the advantage. The spring could be half as long and still provide the same range of adjustability and travel, same sprig rate, and all.
Why do you say it's nice to have such a long spring and still be lowered? I don't see the advantage. The spring could be half as long and still provide the same range of adjustability and travel, same sprig rate, and all.
-Chris
'91 Audi 200 20v - Revver/BAT project
'91 Audi 200 20v Avant
'01 Anthracite M5
'90 M3
'85 Euro 635csi
'12 X3
E34 530i (maybe rear-mount soon)
'91 Audi 200 20v - Revver/BAT project
'91 Audi 200 20v Avant
'01 Anthracite M5
'90 M3
'85 Euro 635csi
'12 X3
E34 530i (maybe rear-mount soon)
Re: Josh's 2.5 200QT.
loxxrider wrote:Cool idea on the grease. Is that grease appropriate for the poly material? I know powerflex supplies special grease with theirs. It may not be that special though.
Why do you say it's nice to have such a long spring and still be lowered? I don't see the advantage. The spring could be half as long and still provide the same range of adjustability and travel, same sprig rate, and all.
I used standard bearing grease and used a grease gun to inject it to test my idea to make sure the grease gun pressure forced the grease around to the two ports I drilled and to verify it made it to the sleeve. I then pulled it apart to verify that it works as planned. I talked to energy suspension about the bearing grease before doing it so that I wouldn't have worry about it having some bad reaction and breaking down the Poly. They said it is perfectly fine to use. The clear stuff that all of the Poly manufacturers use is to prevent water washout. I guess it is more sticky or less water soluble. No one offers the clear stuff in a grease gun cartridge either, so it would defeat the purpose of adding the grease zerks. It is sold in tubs or little tiny squeeze packets. I'm not worried about grease washout because I have no intention of driving it through any creeks. I just wanted a tight, strong, quiet, available, cheap, easy to maintain solution and crawling under to give it a pump once a year seems practical enough.
I love having the longer spring because of ride quality. I know a 400 pound spring that is 6" in length is supposed to be the same as a 400 pound 14" spring... For every 400 pounds, you compress one inch yada yada yada, but I know for sure that longer springs with the same spring rate ride better. I have done lots of trial and error with linear coil rates and coilovers in my rock crawler (which I know is not comparing apples to apples) but I am positive longer springs give a better ride which is my concern. I want long travel so I don't have to worry about a tender spring. I had many conversations about the design of the springs with the company. There are several things to consider about coils. These high travel series coils were designed using a thinner wire than the standard off the shelf coil. I'm not an engineer and don't pretend to be but they started telling me about a rate of coil bind x's length of time.... Not demanding more than 30% of travel from a spring... And a lot of figures, math, and formulas that I had no interest in even trying to understand them about when designing coils/rates/weights. I do know 100% without a doubt though that my back and but was the judge of long vs. short coils that had the same exact spring rates. I want a comfortable ride but firm enough for control. It's not a track car and I want it suitable for daily driving.
Maybe you can call them and get into conversation about the two. I'm not qualified to test or question them.
- Attachments
-
- image.jpg (1.17 MiB) Viewed 40240 times
Re: Josh's 2.5 200QT.
Thanks for the explanations. That's good to know about the grease.
On the spring, the only reason why the ride would be any different is because of coil bind and compression. Otherwise the math and physics dictate that there would be no difference. If you are indeed compressing the coils too much with what little travel you are using in a car like this, then it may help to have it set up like that. Either way, it certainly can't hurt! I'm looking forward to final impressions of this rear end setup.
On the spring, the only reason why the ride would be any different is because of coil bind and compression. Otherwise the math and physics dictate that there would be no difference. If you are indeed compressing the coils too much with what little travel you are using in a car like this, then it may help to have it set up like that. Either way, it certainly can't hurt! I'm looking forward to final impressions of this rear end setup.
-Chris
'91 Audi 200 20v - Revver/BAT project
'91 Audi 200 20v Avant
'01 Anthracite M5
'90 M3
'85 Euro 635csi
'12 X3
E34 530i (maybe rear-mount soon)
'91 Audi 200 20v - Revver/BAT project
'91 Audi 200 20v Avant
'01 Anthracite M5
'90 M3
'85 Euro 635csi
'12 X3
E34 530i (maybe rear-mount soon)
-
amd is the best

- Posts: 1431
- Joined: Wed Feb 27, 2013 12:25 am
- Location: Schenectady, NY
Re: Josh's 2.5 200QT.
Me too Chris. Because I am buying this setup for my Avant.
Re: Josh's 2.5 200QT.
We're on the same page...amd is the best wrote:Me too Chris. Because I am buying this setup for my Avant.
-Chris
'91 Audi 200 20v - Revver/BAT project
'91 Audi 200 20v Avant
'01 Anthracite M5
'90 M3
'85 Euro 635csi
'12 X3
E34 530i (maybe rear-mount soon)
'91 Audi 200 20v - Revver/BAT project
'91 Audi 200 20v Avant
'01 Anthracite M5
'90 M3
'85 Euro 635csi
'12 X3
E34 530i (maybe rear-mount soon)
Re: Josh's 2.5 200QT.
Yeah, I will give a thumbs up once I get it out of the alignment shop. There are some details that I will go through once I'm finished. One being... When you order the shocks, they come with sleeves that are standard and not for a metric bolt so it leaves you having to drill out your bracket a little larger to accept a standard size bolt or you can get round stock and machine two sleeves to fit the factory metric bolts. I have not searched yet for off the shelf metric sleeves yet. I'm choosing to do sleeves that match the metric bolt as I don't want to remove any strength from the shock tabs on the knuckle. Two being... Not sure if a 14" will be better for this instead of 12". I got 12" springs to insure I could go low enough but that presents the issue of adding a bump stop. QA1 said if I go with a 14" spring that there is no way I would have to worry about bottoming out the shock. Not s big deal, I can just instal a bump stop that installs on the shock shaft. Third being... When you go this low, the large inner bushing in the control arm is now already in a bind at lowered ride height, which means premature bushing wear. My fix for that is bolting in the suspension, take the measurement where desired ride height is going to be (bottom of fender and centerline of hub) cut the ear off the control arm that houses that bushing and let the rubber spring to its natural position, then weld the bushing housing back to the control arm where it naturally wants to be positioned. Best I can tell, it looks like it needs to be re-clocked about 15 degrees. Going this far isn't this necessary, but I want everything to be aligned correctly, not in a bind at normal desired ride height, and for the bushing to not prematurely wear. Even with the H&R springs, the inner bushings were already in a bind at ride height, so I'm going to go the extra step. I will shoot a short video explaining what I'm talking about. I am just waiting on the two inner bushings to come in so I can explain. They should have been here today but show to still be in Pennsylvania. When I'm done, there will be nothing half assed.
On another note, after cleaning the caked up grease ball of a diff and the gas tank where the diff tucks into, I removed the little plastic cap on the diff and installed a rubber hose and ran it off to the side. (Also put stainless wool in as a filter media in hose lower than diff) It still is able to breathe but now if it ever has to puke for whatever reason, it won't go all over the top of the diff, run down the sides and have dust stick to it. also it will make it clear to see which side ever has a output flags seal go bad again.
On another note, after cleaning the caked up grease ball of a diff and the gas tank where the diff tucks into, I removed the little plastic cap on the diff and installed a rubber hose and ran it off to the side. (Also put stainless wool in as a filter media in hose lower than diff) It still is able to breathe but now if it ever has to puke for whatever reason, it won't go all over the top of the diff, run down the sides and have dust stick to it. also it will make it clear to see which side ever has a output flags seal go bad again.
-
themagellan

- Posts: 873
- Joined: Tue Mar 05, 2013 10:36 am
Re: Josh's 2.5 200QT.
This looks glorious, definitely a copy cat worthy setup.
Re: Josh's 2.5 200QT.
Thanks
My last two bushings came in today, so I should be able to make some progress and shoot a short video of the rear trying to explain what I'm doing with the inner bushings. It should be helpful.
My last two bushings came in today, so I should be able to make some progress and shoot a short video of the rear trying to explain what I'm doing with the inner bushings. It should be helpful.
Re: Josh's 2.5 200QT.
Ok, got mostly good news with just one issue to correct. I put the bushing in, put the suspension back together and ran it through full travel with the shock in minus the spring. I don't have to re-clock the bushing housing (thank god) and everything rotates and articulates without any issue. My only issue to correct Is the track bar. At full compression, it puts the inner ball joint style connection in a bind more than I like. I need to think of a clever solution for it and it will make this rear suspension project perfect. There is a big height difference between the knuckle attachment and the height where it attaches to the sub-frame. Im not sure if I'm going to put an offset in it to take it out of the high angle or search for a high angle/high misalignment replacement.
Here is a picture that pretty much tells it all. Three things in this picture... The suspension is so low/stuffed that the CV axle can touch the bottom of the car body... The shock is not bottomed out on itself even as low as it is setting... And all the while the bushing housing is not leaned over too bad and touching the tabs on the subframe. The picture is taken at the lowest the car will ever see. I will look at putting a bump stop in and maybe making a small half circle relief cut for the CV axle to have a little extra forgiveness on the upward travel. I will either have one on the shock shaft or mount an external one that will mount to to subframe and contact the control arm.
Here is a picture that pretty much tells it all. Three things in this picture... The suspension is so low/stuffed that the CV axle can touch the bottom of the car body... The shock is not bottomed out on itself even as low as it is setting... And all the while the bushing housing is not leaned over too bad and touching the tabs on the subframe. The picture is taken at the lowest the car will ever see. I will look at putting a bump stop in and maybe making a small half circle relief cut for the CV axle to have a little extra forgiveness on the upward travel. I will either have one on the shock shaft or mount an external one that will mount to to subframe and contact the control arm.
- Attachments
-
- image.jpg (1.01 MiB) Viewed 40229 times
Re: Josh's 2.5 200QT.
I'm going to post 3 videos. They suck but it might give a better explanation. Video 1...
Re: Josh's 2.5 200QT.
Video 2